# CentOS 6 as Apple TimeMachine Backup
TimeCapsule is the Apple (closed) backup system. But... even if closed, you can configure a linux server to be your TimeMachine network disk, like TimeCapsule does.
First of all you need a linux system and, to follow this step-by-step guide, you need a CentOS 6.X linux.
#### Installation
Configure EPEL repository, if your system is not yet configured with it:
sudo rpm -Uvh http://www.mirrorservice.org/sites/dl.fedoraproject.org/pub/epel/6/i386/epel-release-6-8.noarch.rpm
Then install all the necessary services:
sudo yum clean all
sudo yum make cache
sudo yum -y install netatalk avahi  dbus nss-mdns
####Configuration
Configure netatalk service editing the */etc/netatalk/afpd.conf* file and adding the following line at the end of the file:
- -transall -uamlist uams_randnum.so,uams_dhx.so,uams_dhx2.so -nosavepassword -advertise_ssh
Create folder to use for TimeMachine backups:
mkdir -p /mnt/data/TimeMachine
chown youruser:youruser /mnt/data/TimeMachine
Where *youruser* is a linux local user that can connect to the system (with a password) and the one you want to allow to use TimeMachine backup.
Then edit the netatalk AppleVolumes file (*/etc/netatalk/AppleVolumes.default*) and add the folder you want to use for your backups:
/mnt/data/TimeMachine allow:youruser options:usedots,upriv,tm dperm:0775 fperm:0660 cnidscheme:dbd
You just need to change *youruser* with the previously selected user.
Next configure the nsswitch service into the file */etc/nsswitch.conf* and add the following line at the end:
hosts: files mdns4_minimal dns mdns mdns4
In Avahi, configure the afpd service to be brodcasted on the network via the avahi daemon. Create the file */etc/avahi/services/afpd.service* with the following content:
<?xml version=”1.0″ standalone=’no’?>
<!DOCTYPE service-group SYSTEM “avahi-service.dtd”>
<service-group>
<name replace-wildcards=”yes”>%h</name>
<service>
<type>_afpovertcp._tcp</type>
<port>548</port>
</service>
<service>
<type>_device-info._tcp</type>
<port>0</port>
<txt-record>model=TimeCapsule</txt-record>
</service>
</service-group>
Disable the SSH service from avahi:
mv /etc/avahi/services/ssh.service /etc/avahi/services/ssh.service.disabled
If you have iptables enabled on your system, you need to open the ports used by TimeMachine. Add these lines to your */etc/sysconfig/iptables* file:
-A INPUT -p tcp -m state --state NEW -m tcp --dport 548 -j ACCEPT
-A INPUT -p tcp -m state --state NEW -m tcp --dport 5353 -j ACCEPT
-A INPUT -p tcp -m state --state NEW -m tcp --dport 5354 -j ACCEPT
-A INPUT -p udp -m udp --dport 548 -j ACCEPT
-A INPUT -p udp -m udp --dport 5353 -j ACCEPT
-A INPUT -p udp -m udp --dport 5354 -j ACCEPT
Reload the iptables configuration, or restart the service:
/sbin/service iptables restart
Ensable and start all service:
/sbin/chkconfig netatalk on
/sbin/chkconfig messagebus on
/sbin/chkconfig avahi-daemon on

/sbin/service avahi-daemon restart
/sbin/service messagebus restart
/sbin/service netatalk restart
Going back to your Mac the disk should be visible in your TimeMachine.
If not try to check services (*/sbin/service xxx status*) and restart them.
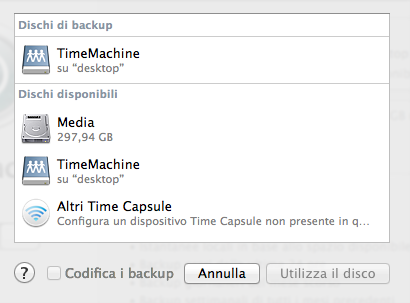
Enjoy your new OpenSource (and low cost!!) TimeCapsule