

Making your home smart has several benefits, but the most important is that you can automate everything based on events: close the shutters if the sun is heating the house; turn off all the lights when you are leaving, … If well configured, it makes your home much more environmentally friendly.
Today I would like to talk about the “Mechanical Ventilation System” (VMC here in France): a system used to renew indoor air by reducing odors and humidity.
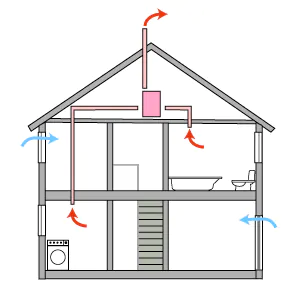
Normally, the simplest device is having 2 speeds (slow and fast), runs 24/7, and we can manually change the speed by acting on a switch. This is exactly where automation becomes interesting. For example: if the humidity is too high in one of the rooms in which VMC is extracting the air, we can auto-move to the fastest speed. But, how to proceed?
VMC wiring diagram#

In the double-speed VMC, there are two capacitors used to “help the engine” start and run at the correct speed; power goes to the engine via these two capacitors. The speed is selected with the proper wire going through a single capacitor or both two.
How to connect a Smart Module?#
We need to choose a double switch smart module that can select slow or fast mode and send power “indefinitely” to the engine. I’m saying this because online you can find a ton of tutorials talking about the “Fibaro Roller Shutter”, the module used to automate the covers. With the old version (FGR-222) the device settings allow you to remove the “stop timer” (engine always on). With the new device (FGR-223), Fibaro removed this setting and the engine stops after a while. It’s now a dedicated cover device.
To automate the VMC (or anything requiring permanent power), on the Fibaro side, look at the FGS-xxx devices. The latest double switch is now the FGS-224.
But Fibaro means Z-Wave protocol, which requires a SmartBox hub that understands the protocol. If you’re just starting out or don’t want a hub, check out the Shelly modules, which work over WiFi and simplify your setup. For the VMC automation, you can check the Shelly 2.5. In my case, I already had a SmartHome Box and, due to the location, I wasn’t sure about the WiFi signal, I preferred the Fibaro automation with the FGS-224.
The wiring is really simple and you can follow what is proposed directly on the device documentation.
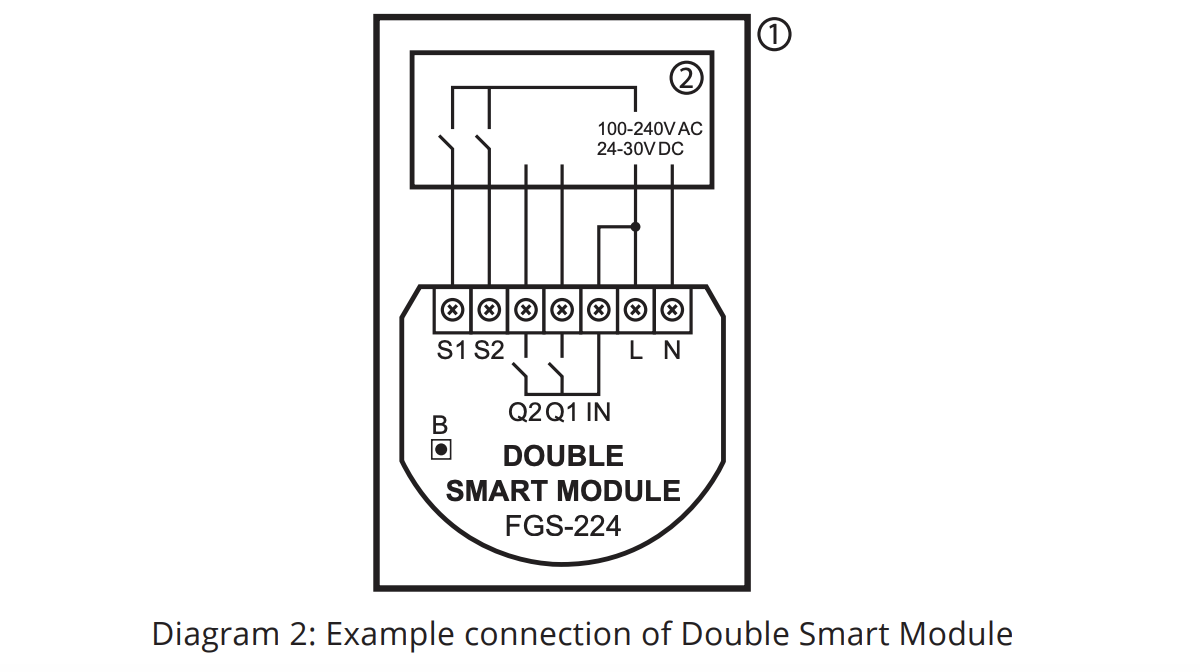
We can modify the first schema slightly and introduce our Smart Module:

NB: If you are choosing a different one, you have to check the documentation to be sure how to link it up.
The module provides power to the VMC via the Q1 or Q2 link that you need to connect to the slow and fast speed (never mind which one on what, you can name them later into your smarthome box).
Home Assistant Integration and Configuration#
First of all, you need to pair the device based on your earlier decisions: Wifi, Z-Wave, SmartBox Hub, or not, …
Once the Fibaro is paired with your box you have a new device with the following properties:
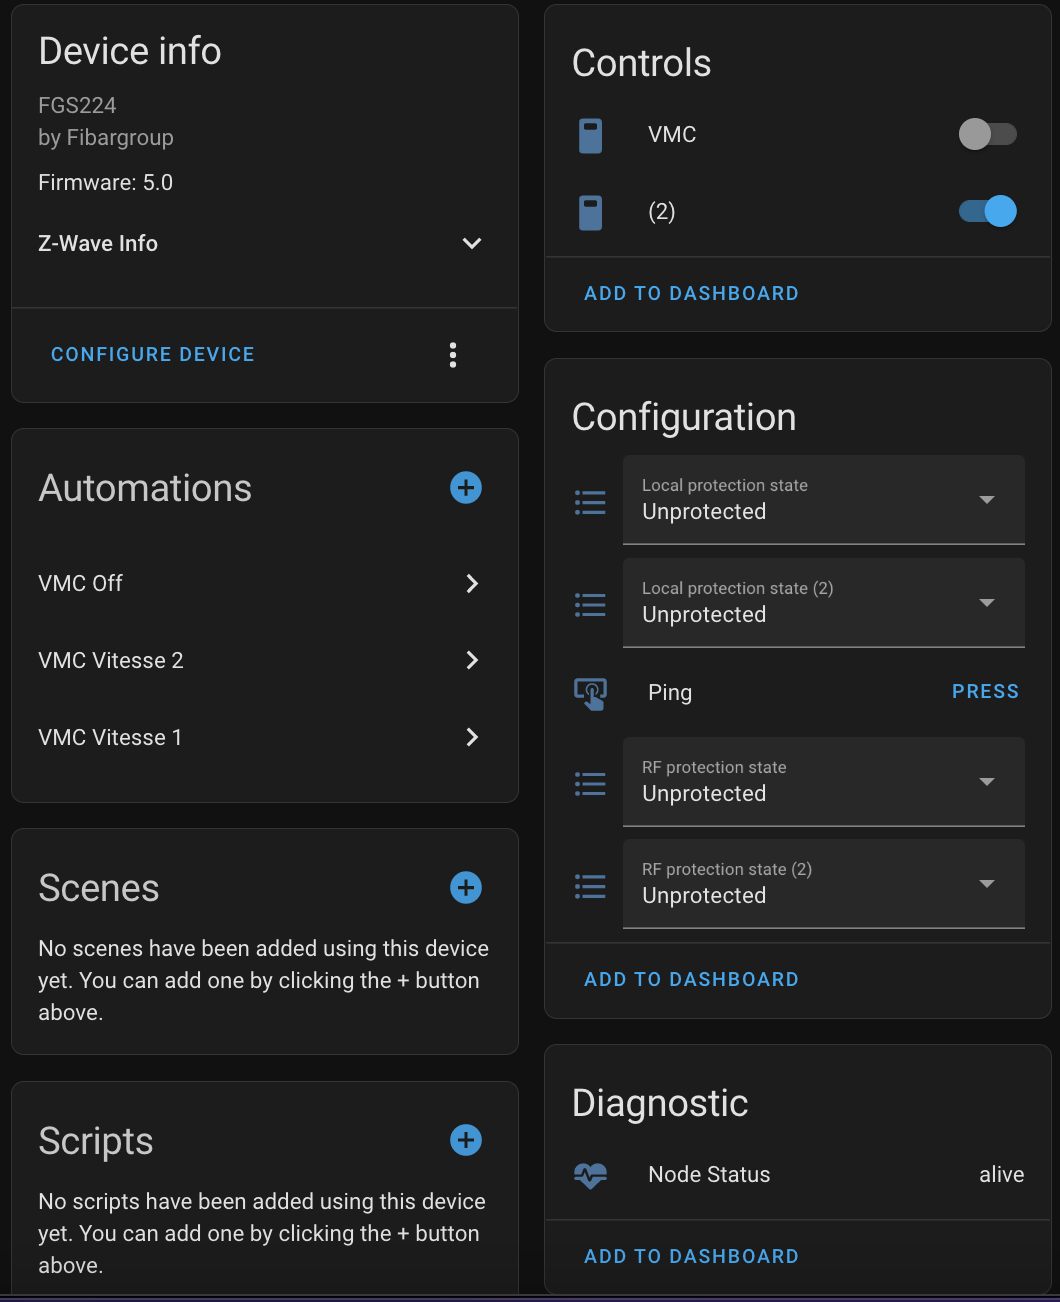
You don’t need any specific setting over the device; the important part here is the 2 switches (in my screenshot “VMC” and “(2)”… no idea why by default it is named in this shitty way 😅). Each one acts on a Qx output pin, and if wired correctly, sends power to the appropriate VMC speed cable.
⚠️ WARNING never power on both switches at the same time. Your VMC might not appreciate it.
For this reason, in my installation, I based the switch changes on an input_select component with 3 states Off, “Speed 1” and “Speed 2”.
input_select:
  vmc:
    name: VMC State
    icon: mdi:fan
    options:
      - "Off"
      - "Speed 1"
      - "Speed 2"
Then 3 automations are reacting to the input_select state change.
automation:
  - id: vmc_slow
    alias: VMC Speed 1
    trigger:
      - platform: state
        entity_id: input_select.vmc
        to: "Speed 1"
    action:
      - service: switch.turn_off
        entity_id: switch.vmc_2
      - delay: 5
      - service: switch.turn_on
        entity_id: switch.vmc

  - id: vmc_fast
    alias: VMC Speed 2
    trigger:
      - platform: state
        entity_id: input_select.vmc
        to: "Speed 2"
    action:
      - service: switch.turn_off
        entity_id: switch.vmc
      - delay: 5
      - service: switch.turn_on
        entity_id: switch.vmc_2

  - id: vmc_off
    alias: VMC Off
    trigger:
      - platform: state
        entity_id: input_select.vmc
        to: "Off"
    action:
      - service: switch.turn_off
        entity_id: switch.vmc_2
      - service: switch.turn_off
        entity_id: switch.vmc
The actions are changing the switch states to be sure we never have the 2 switches on at the same time
- service: switch.turn_off
  entity_id: switch.vmc_2
- delay: 5
- service: switch.turn_on
  entity_id: switch.vmc
It will first switch off the one we don’t need anymore, wait 5 seconds (or whatever… I don’t think it’s strictly necessary, but I preferred to keep it safe with a small delay) and switch on the other switch.
With a sensor we can track the VMC status and speed:
- platform: template
  sensors:
    vmc_status:
      friendly_name: VMC Status
      icon_template: >
        {% if is_state("switch.vmc", "on") and is_state('switch.vmc_2', 'off') %}
         mdi:fan-speed-1
        {% elif is_state("switch.vmc_2", "on") and is_state('switch.vmc', 'off') %}
          mdi:fan-speed-2
        {% elif is_state('switch.vmc', 'off') and is_state('switch.vmc_2', 'off')%}
          mdi:fan-off
        {% else %}
          mdi:fan-alert
        {% endif %}
      value_template: >
        {% if is_state('switch.vmc', 'on') and is_state('switch.vmc_2', 'off') %}
          Vitesse 1
        {% elif is_state('switch.vmc_2', 'on') and is_state('switch.vmc', 'off') %}
          Vitesse 2
        {% elif is_state('switch.vmc', 'off') and is_state('switch.vmc_2', 'off')%}
          Off
        {% else %}
          failed
        {% endif %}
For a simple integration, this is everything you need. You can display everything in a Lovelace card to control your VMC:
type: entities
entities:
  - entity: sensor.vmc_status
    icon: ''
    secondary_info: last-changed
  - entity: input_select.vmc
state_color: true
title: VMC
show_header_toggle: false
giving you something like:

Full Automation#
This is quite cool, isn’t it? But making the VMC smart means giving full autonomy to your home and always keeping the right parameters. If we keep only a manual button, there’s not much difference from the original setup.
In my case I installed a device in each room, giving me the temperature and the humidity. Depending on the version and the brand of the device you can have even the pressure, the CO2, … or several other parameters.
So we can easily automate based on room humidity!
- id: shutdown_vmc_based_humidity
  alias: Auto VMC Off Humidity < 55
  trigger:
    - platform: time_pattern
      minutes: "/30"
  condition:
    - and:
        - condition: numeric_state
          entity_id: sensor.humidity_114
          below: 55
        - condition: numeric_state
          entity_id: sensor.humidity_112
          below: 55
        - condition: numeric_state
          entity_id: sensor.humidity_93
          below: 55
        - condition: template
          value_template: "{{ not is_state('input_select.vmc', 'Off') }}"
  action:
    - service: input_select.select_option
      target:
        entity_id: input_select.vmc
      data:
        option: "Off"

- id: startup_vmc_based_humidity
  alias: Auto VMC On 55 < Humidity < 70
  trigger:
    - platform: time_pattern
      minutes: "/30"
  condition:
    - and:
        - condition: numeric_state
          entity_id: sensor.humidity_114
          above: 55
        - condition: numeric_state
          entity_id: sensor.humidity_114
          below: 70
        - condition: numeric_state
          entity_id: sensor.humidity_112
          above: 55
        - condition: numeric_state
          entity_id: sensor.humidity_112
          below: 70
        - condition: numeric_state
          entity_id: sensor.humidity_93
          above: 55
        - condition: numeric_state
          entity_id: sensor.humidity_93
          below: 70
        - condition: template
          value_template: "{{ not is_state('input_select.vmc', 'Vitesse 1') }}"
  action:
    - service: input_select.select_option
      target:
        entity_id: input_select.vmc
      data:
        option: "Vitesse 1"

- id: increase_vmc_speed_based_humidity
  alias: Auto VMC Speed 2 Humidity > 70
  trigger:
    - platform: time_pattern
      minutes: "/30"
  condition:
    - and:
        - or:
            - condition: numeric_state
              entity_id: sensor.humidity_114
              above: 70
            - condition: numeric_state
              entity_id: sensor.humidity_112
              above: 70
            - condition: numeric_state
              entity_id: sensor.humidity_93
              above: 70
        - condition: template
          value_template: "{{ not is_state('input_select.vmc', 'Vitesse 2') }}"
  action:
    - service: input_select.select_option
      target:
        entity_id: input_select.vmc
      data:
        option: "Vitesse 2"
In my configuration, I’m checking 3 rooms: the kitchen, the bathroom, and the toilet (each one is having the VMC air link). We need to be careful with the OR and AND conditions to prevent two actions from firing at the same time.
- If the humidity in all the rooms is less than 55%: power off the VMC
- If the humidity is in a selected interval for all the rooms: Speed 1
- If the humidity is higher than a defined value (70%) in at least one room: Speed 2
You can set whatever humidity values you want… on my side, I based the automation on the idea that the internal humidity, to be comfortable, should be between 40% and 70%.
I’m using a time-based trigger rather than reacting directly to humidity to prevent frequent speed changes around the threshold. With the time trigger, once changed, the configuration will be kept for at least 30 minutes.
When the automation conditions are met, the action changes the input_select, not the switch directly. This keeps our configuration safe because only one component controls the VMC and the two switches. Even if two automations fire at the same time, they both change the same input_select, resulting in a single, deterministic VMC state.
When everything is set up, your VMC will react to humidity to keep a comfortable home environment